I'm having a Huge Clearance Sale throughout my website.
A lot of my items have been marked 20% off. You could be paying up to 60% off some of my items that were already on sale. I'm getting rid of the old to make room for the new.
These items are sold as is which means no adjustments or custom orders on these items will be made. No refunds either.
*Coupons or other special discounts are not valid with these items.
Take advantage of this sale. Shop today, don't delay! Visit my shop at http://www.rosesdesigns.etsy.com/

Sunday, April 17, 2011
Monday, April 4, 2011
MY NEW UPDATED 2011 WORKSPACE
Welcome to my studio/office! I am a jewelry designer with a website business. I would like to share with you my recently updated work/office space and show you how I stay organized. I recently outgrew my old space and wanted to give my space a whole new look with more storage and organization. I researched the internet including flickr, looking for some inspiration but was disappointed to find none. Nothing seemed to "Wow" me. I finally gave up and put my mind to work. I will walk you through each area and explain my system.
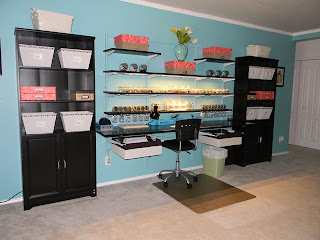
This is our family gameroom turned into my workspace/office. Because this is still part of our home, I didn't want this room to look to tacky.

I started by purchasing new office furniture that includes a desk, hutch, filing cabinet and two book shelves. A friend/customer of mine suggested I paint my room turquoise and I took her advice. As you can see we still need to finish painting one corner. To save on space, I hung our flat screen t.v. on the wall.


 We also added lights under the shelves. I am slowly installing 1 row at a time. Not only do I get much needed lights but great ambiance. I also purchased some decorative boxes and baskets from the "Container Store" for storage. They have a large selection.

I keep my jewelry pliers and most used tools in these trays and small baskets.

Right above I have bins with some of my most used supplies such as crimps, etc.


Each jewelry piece I make is kept in a zip lock bag (jewelry box for the big items) with a small sheet that includes the supplies I used on the item, cost and price of the item.

On this side of the room, I do all my handstamping and personalized jewelry & gifts. Each side has a bin system with rolling wheels. On one I store more beads. Each bin stores a specific color. On the other bin system, I store all of my handstamping supplies and tools. I purchased these at "Office Depot". However, I don't recommend them. I spent $50 on each one and they are flimsy. In this area, I plan on replacing those 2 tables with a long small & sturdy table for my handstamping. I just have to get my hubby motivated so he can build me one. :)
This is our family gameroom turned into my workspace/office. Because this is still part of our home, I didn't want this room to look to tacky.
I started by purchasing new office furniture that includes a desk, hutch, filing cabinet and two book shelves. A friend/customer of mine suggested I paint my room turquoise and I took her advice. As you can see we still need to finish painting one corner. To save on space, I hung our flat screen t.v. on the wall.


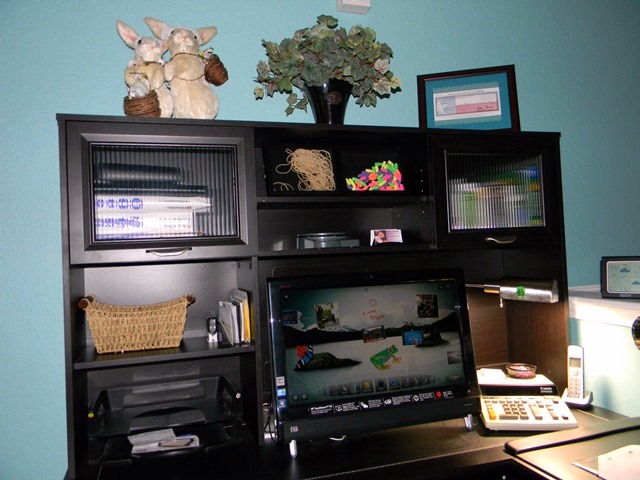
This is where I do all of my office work. We also purchased a new touchscreen computer. Welcome to the world of technology. I do all of my billing and accounting using an accounting software called "Quickbooks". I do my own business and personal taxes using "Turbo Tax Small Business/Personal". Don't be intimidated, give it a try. It's really not that difficult, just time consuming.

I knew I wanted a long table where I could lay everything out and I wanted shelves above for storage. I drew out a plan and asked my husband to build me a workspace with shelving. We went to "Lowes" and found a metal wall unit that is used in closets. We bought some wood, stained it and voila! The nice thing is that you can add shelves or reposition the ones you have as your storage needs evolve.


Going back to my work table, on my bottom shelve, I screwed in the tops of containers. The bottom containers store a lot of my most used small items.

I keep my jewelry pliers and most used tools in these trays and small baskets.

Right above I have bins with some of my most used supplies such as crimps, etc.

Below you will see glass jars I purchased at 3 different stores "Gardenridge", "Hobby Lobby" & "Michaels". I store beads and findings in these jars by color. It might not seem like a lot but there are quite a few and I still can't fit all my beads in them.


Below my work table, I have one drawer on each side. On one side, I keep my soldering supplies & tools. and on the other I keep wire & chain. I bought these drawers at "Lowes" they are made to attach to the shelving wall unit.

I added a book shelve on each side of the work table. I keep more decorative boxes and baskets on each shelve. I hide my shipping supplies & misc. items in the bottom cabinets.

In the boxes and baskets, I store all of my finished jewelry. Well over 200 pieces. The Baskets and boxes are labeled "Necklaces", Bracelets, etc.


On this side of the room, I do all my handstamping and personalized jewelry & gifts. Each side has a bin system with rolling wheels. On one I store more beads. Each bin stores a specific color. On the other bin system, I store all of my handstamping supplies and tools. I purchased these at "Office Depot". However, I don't recommend them. I spent $50 on each one and they are flimsy. In this area, I plan on replacing those 2 tables with a long small & sturdy table for my handstamping. I just have to get my hubby motivated so he can build me one. :)


And last but not least, my supplies are never ending. I have a separate closet where I keep more supplies and my stock of jewelry boxes I use for my customer's jewelry.


This is it. This is where it all happens from start to finish. Now that I'm almost done with my room I can be creative again and start building more new items. Be sure and visit my website at http://www.rosesdesigns.etsy.com/.
Please feel free to leave any comments or suggestions. Do you have a workspace you would like to share with everyone? Feel free to post it here.
Now that I'm done, would you like to see what my old space looked like before? Check out the before. Let me know which one you like better. http://rosesdesigns.blogspot.com/2010_04_01_archive.html
Always remember, we're all creative in our own way. Don't be afraid to try something. You'll never know until you try. Happy Creating!
Rose

On the left, I have this awesome mirror/jewelry box that my mother-in-law gave me for my new space. I am in love with it. It is suppose to store up to 300 pieces of jewelery and comes with an anti-tarnish lining that is suppose to last up to 25 years. She purchased this on "QVC".


And last but not least, my supplies are never ending. I have a separate closet where I keep more supplies and my stock of jewelry boxes I use for my customer's jewelry.


This is it. This is where it all happens from start to finish. Now that I'm almost done with my room I can be creative again and start building more new items. Be sure and visit my website at http://www.rosesdesigns.etsy.com/.
Please feel free to leave any comments or suggestions. Do you have a workspace you would like to share with everyone? Feel free to post it here.
Now that I'm done, would you like to see what my old space looked like before? Check out the before. Let me know which one you like better. http://rosesdesigns.blogspot.com/2010_04_01_archive.html
Always remember, we're all creative in our own way. Don't be afraid to try something. You'll never know until you try. Happy Creating!
Rose
How to measure for your Bracelet Size
If you haven't already purchased a RosesDesigns bracelet, I invite you to do so now by visiting me at http://www.rosesdesigns.etsy.com/.

Here are instructions on how to measure your wrist for my bracelets:
Using a flexible measuring tape, measure just above (towards elbow) the wrist bone, then add 1/4" to 1" (1/2" is average) depending on how tight you like your bracelets to fit. That is the size bracelet you would wear. *Tip: If you don't have a tape measure handy, use a strip of paper or thin string, and mark it where it overlaps on your wrist. Then lay the strip flat to measure up to the mark using any ruler.

Women's Standard Bracelet Sizes:
6.5 inches -----------Adult X-Small
7 inches -------------Adult Small
7.5 inches -----------Adult Medium
8 inches -------------Adult Large
8.5 inches -----------Adult X-Lg.
Men’s Bracelet Sizes
8 inches -------------Adult Average size wrist
9 inches -------------Adult Large
10 inches -----------Adult X-Large
Once you're done you can return to my medical bracelets here -> http://www.etsy.com/shop/RosesDesigns?section_id=7104173
Subscribe to:
Posts (Atom)