Tuesday, October 1, 2013

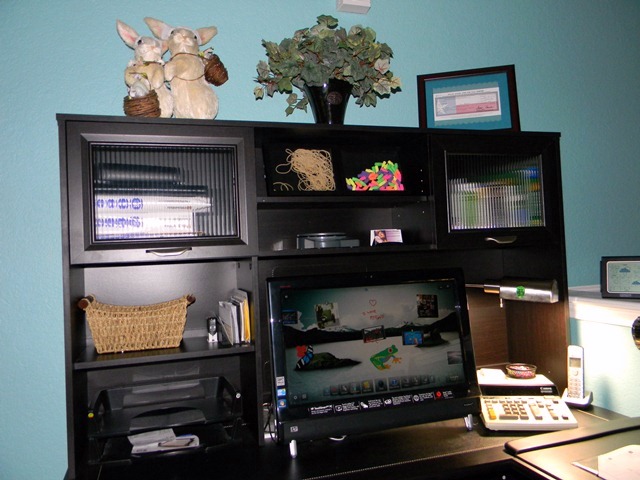
SNEAK PEAK OF MY WORKSPACE

I wanted to share my workspace with you.  This is where all my designs are created, packaged and shipped.  I also have 2 closets where I keep my supplies. As soon as I get pictures of those, I'll be sure to post them.  Feel free to share how you keep yourself organized.


Thursday, January 3, 2013

DUCT TAPE PURSE/BAG


I was in need of a more stylish bag to carry my PTA paperwork.  In the past, I've made flower pens, bracelets and even a woven wallet.  However, I hadn't tried making a purse until now.  I was feeling a little creative last night so I picked up some duct tape and this is what I came up with.
 
I recently saw a purse one of my young daughter's friends made out of duct tape.  At the moment, my mind just started running wild with my own ideas.  Thank you Lauren for inspiring me to make my own!  I can't wait to make another one.
 
I have added pictures below with different views of the purse.  The purse is completely made with duct tape except for a few embellishments I used in the front.  


Thursday, June 28, 2012

No Bake Icebox Cake

I found a recipe on Pinterest via "The Kitchen" and knew I had to try it.  This was my result.

 I took heavy whipping cream and added 1 tsp of vanilla and about 1/3 of confectioners sugar to make whipped cream.  I layed a layer of whip cream on the bottom of my glass pan then layed out graham crackers.  Put another layer of whipped cream, strawberries.  Since the kids and I like Rasberries we added them, too.  Repeat this to make it 3 layers.  Drizzle some chocolate topping on top.  Refrigerate for about 3 hours to soften the crackers and enjoy!

Sunday, April 22, 2012

Teacher Appreciation Week

DON'T FORGET YOUR TEACHER!

Teacher Appreciation Week is May 7th - 11th.  Take the time to say "Thank You" to that special teacher.  Here is a card my kids made for their teacher.


Friday, February 24, 2012

Chicken Posole Soup

This soup is so delicious and is similar to menudo but without the tripe.

WHAT YOU WILL NEED:
  • Whole Chicken- The bigger the better
  • 2 Large Cans of Hominy *Picture shown below for those who don't know what it is.
  • Pkg. of Menudo Spice Mix *Picture shown below for those who have never seen it. If you can't find this, you can try using about 5 tbs of chili powder. You can add more or less depending on your taste. 
  • 3 Cloves of Garlic (minced) or Garlic Salt
  • Half of an onion
  • 1 tsp Oregano
  • Salt
  • Small Frozen Corn on the Cob (optional)


LETS GET STARTED  
  1. Take your thawed chicken and remove the giblets.  Boil your chicken in a big pot.  Use the biggest pot you normally use for soups.
  2. Once the chicken is cooked, do not throw away the broth.  Remove all the chicken from the bones and put your chicken back in the pot.
  3. Once your chicken is back in the pot, you want to add the following to your pot:
  4. 2 Large Cans of Hominy (drained).
  5. Menudo Spice Mix.  Use the whole pkg.
  6. Half of a chopped or sliced onion
  7. 3 Cloves of Garlic (minced) or garlic salt is fine too.
  8. Salt- quantity depends on your taste
  9. Corn on the cob
  10. Fill the pot with more water almost to the top.
  11. Cook at medium to medium high heat until menudo spices dissolve and hominy is cooked. 
Your Posole is ready.  I hope you enjoy it!

Sunday, February 19, 2012

Fruit Kobobs


These cobobs will definately hit the spot.  My kids and I are having fun this weekend making all kinds of goodies.
  1. First we baked an angel food cake.  You can purchase one already made.  Cut your angel food cake in squares.
  2. 1st layer- Angel Food Cake Square
  3. 2nd Layer- Fresh Pinapple cut into squares
  4. 3rd Layer- Large Marshmallows
  5. 4th Layer- Strawberry
  6. Repeat until you get to the end.
  7. Melt the flat Chocolate Chips for baking.  I purchase the plastic bags for decorating cakes then place the chocolate chips in the bag.  You can even find these at Hobby Lobby.    Microwave as directed until melted.
  8. Drizzle your cobobs with chocolate.  The chocolate will harden.
Enjoy!

Saturday, February 18, 2012

Fun and Healthy Fruit Parfaits

I have been trying to get my kids to eat a little more healthy so I decided to make something fun and easy with them and they absolutely love it.  Surprisingly, they told me they taste better than the ones from McDonalds.
  1. First we crushed some graham crackers then added the graham crackers as the bottom layer.
  2. 2nd Layer- Add sliced strawberries, blueberries and rasberries.  I cut my strawberries with a crinkle cutter to make it fun for the kids.
  3. 3rd Layer- 99% Lowfat Plain Yogurt.  I don't like anything lowfat but this yogurt is good.  Then again if I'm not mistaken, I think all yogurts are lowfat?
  4. Repeat steps 2 and 3 until you get to the top of your clear plastic tumbler.
  5. Sprinkle the top with graham crackers and add another layer of your fruit.
Enjoy!

Monday, June 20, 2011

MY FEATURE ON DAIZEE DOTS

I'm excited to say my shop "RosesDesigns" will be featured on Daizee Dot's blog on Friday, June 24, 2011.  Please be sure to stop by and read my interview at http://www.daizeedots.blogspot.com/.  I will also be offering a special coupon code on that day on her blog.  Thank you for your support!

Daizee Dots also has a shop of her own.  She specializes in cute and unique baby/toddler attire so please be sure and check her items out as well.  Thank you!

Sunday, April 17, 2011

HUGE CLEARANCE SALE

I'm having a Huge Clearance Sale throughout my website.
A lot of my items have been marked 20% off. You could be paying up to 60% off some of my items that were already on sale. I'm getting rid of the old to make room for the new.

These items are sold as is which means no adjustments or custom orders on these items will be made. No refunds either.

*Coupons or other special discounts are not valid with these items.

Take advantage of this sale. Shop today, don't delay!  Visit my shop at http://www.rosesdesigns.etsy.com/

Monday, April 4, 2011

MY NEW UPDATED 2011 WORKSPACE

Welcome to my studio/office!  I am a jewelry designer with a website business.  I would like to share with you my recently updated work/office space and show you how I stay organized.  I recently outgrew my old space and wanted to give my space a whole new look with more storage and organization.  I researched the internet including flickr, looking for some inspiration but was disappointed to find none.  Nothing seemed to "Wow" me.  I finally gave up and put my mind to work.  I will walk you through each area and explain my system.

 This is our family gameroom turned into my workspace/office.  Because this is still part of our home, I didn't want this room to look to tacky.


I started by purchasing new office furniture that includes a desk, hutch, filing cabinet and two book shelves.  A friend/customer of  mine suggested I paint my room turquoise and I took her advice.  As you can see we still need to finish painting one corner.  To save on space, I hung our flat screen t.v. on the wall.

This is where I do all of my office work.  We also purchased a new touchscreen computer. Welcome to the world of technology.  I do all of my billing and accounting using an accounting software called "Quickbooks".  I do my own business and personal taxes using "Turbo Tax Small Business/Personal".  Don't be intimidated, give it a try.  It's really not that difficult, just time consuming.


I knew I wanted a long table where I could lay everything out and I wanted shelves above for storage. I drew out a plan and asked my husband to build me a workspace with shelving. We went to "Lowes" and found a metal wall unit that is used in closets. We bought some wood, stained it and voila! The nice thing is that you can add shelves or reposition the ones you have as your storage needs evolve.


We also added lights under the shelves. I am slowly installing 1 row at a time.  Not only do I get much needed lights but great ambiance. I also purchased some decorative boxes and baskets from the "Container Store" for storage.  They have a large selection.


Going back to my work table, on my bottom shelve, I screwed in the tops of containers.  The bottom containers store a lot of my most used small items.


I keep my jewelry pliers and most used tools in these trays and small baskets.


Right above I have bins with some of my most used supplies such as crimps, etc.


Below you will see glass jars I purchased at 3 different stores "Gardenridge", "Hobby Lobby" & "Michaels". I store beads and findings in these jars by color. It might not seem like a lot but there are quite a few and I still can't fit all my beads in them.


Below my work table, I have one drawer on each side.  On one side, I keep my soldering supplies & tools. and on the other I keep wire & chain.  I bought these drawers at "Lowes" they are made to attach to the shelving wall unit.


I added a book shelve on each side of the work table.  I keep more decorative boxes and baskets on each shelve.  I hide my shipping supplies & misc. items in the bottom cabinets.


In the boxes and baskets, I store all of my finished jewelry.  Well over 200 pieces.  The Baskets and boxes are labeled "Necklaces", Bracelets, etc.  


Each jewelry piece I make is kept in a zip lock bag (jewelry box for the big items) with a small sheet that includes the supplies I used on the item, cost and price of the item.


On this side of the room, I do all my handstamping and personalized jewelry & gifts.  Each side has a bin system with rolling wheels.  On one I store more beads.  Each bin stores a specific color.  On the other bin system, I store all of my handstamping supplies and tools.  I purchased these at "Office Depot".  However, I don't recommend them.  I spent $50 on each one and they are flimsy.  In this area, I plan on replacing those 2 tables with a long small & sturdy table for my handstamping.  I just have to get my hubby motivated so he can build me one. :)


On the left, I have this awesome mirror/jewelry box that my mother-in-law gave me for my new space.  I am in love with it.  It is suppose to store up to 300 pieces of jewelery and comes with an anti-tarnish lining that is suppose to last up to 25 years.  She purchased this on "QVC". 


And last but not least, my supplies are never ending.  I have a separate closet where I keep more supplies and my stock of jewelry boxes I use for my customer's jewelry.


This is it.  This is where it all happens from start to finish.  Now that I'm almost done with my room I can be creative again and start building more new items.   Be sure and visit my website at http://www.rosesdesigns.etsy.com/. 

Please feel free to leave any comments or suggestions.  Do you have a workspace you would like to share with everyone?  Feel free to post it here.

Now that I'm done, would you like to see what my old space looked like before?  Check out the before.  Let me know which one you like better. http://rosesdesigns.blogspot.com/2010_04_01_archive.html

Always remember, we're all creative in our own way.  Don't be afraid to try something.  You'll never know until you try.  Happy Creating!

Rose

How to measure for your Bracelet Size

If you haven't already purchased a RosesDesigns bracelet, I invite you to do so now by visiting me at http://www.rosesdesigns.etsy.com/. 


Here are instructions on how to measure your wrist for my bracelets:
Using a flexible measuring tape, measure just above (towards elbow) the wrist bone, then add 1/4" to 1" (1/2" is average) depending on how tight you like your bracelets to fit. That is the size bracelet you would wear. *Tip: If you don't have a tape measure handy, use a strip of paper or thin string, and mark it where it overlaps on your wrist. Then lay the strip flat to measure up to the mark using any ruler.


Women's Standard Bracelet Sizes:

6.5 inches -----------Adult X-Small

7 inches -------------Adult Small

7.5 inches -----------Adult Medium

8 inches -------------Adult Large

8.5 inches -----------Adult X-Lg.

Men’s Bracelet Sizes

8 inches -------------Adult Average size wrist

9 inches -------------Adult Large

10 inches -----------Adult X-Large

Once you're done you can return to my medical bracelets here -> http://www.etsy.com/shop/RosesDesigns?section_id=7104173

Bracelets, Anklets & Watches -> http://www.etsy.com/shop/RosesDesigns?section_id=5769984

My Home Website: -> http://www.rosesdesigns.etsy.com/

Thursday, November 25, 2010

HUGE CYBER MONDAY/HOLIDAY SALE...

I am having a CYBER MONDAY SALE.  Everything in my shop is 20% Off.  Just use coupone code "CYBERMONDAY" at checkout.  You don't want to miss it.  I have inexpensive gift ideas.  Hope to see you there.  Visit me at http://www.rosesdesigns.etsy.com/.  Thank You!
Happy Holidays to you and your family!

Rose